
Let’s start with the basics in plain English. A proxy is a middle layer between your browser and the websites you open. Instead of connecting to a site directly, your traffic first goes through another server – the proxy – and then reaches the destination. Think of it like asking a receptionist to make a call for you instead of dialing the number yourself. The conversation still happens, but the other side doesn’t see your direct line.
Why do people use a proxy in Google Chrome at all? One reason is control. When you run your browser traffic through a proxy server, you can route it through a specific IP address, sometimes even in a specific country or region. That can be useful for market research, advertising checks, SaaS testing, SEO audits, pricing analysis, and other professional use cases where location matters. Another reason is security policy. Teams and companies often use a proxy server to manage traffic rules, restrict certain destinations, or log activity for compliance. Setting up the browser to use a strict outbound route is a very normal part of corporate IT policies.
You can use either an automatic configuration script (PAC/auto script), or you can manually enter an IP address and port. Both are supported in Chrome, although Chrome itself actually relies on the operating system’s network settings to finish the job. So when we talk about “how to add proxy in Chrome,” we’re really talking about changing network settings that Chrome will follow.
The rest of this guide will walk you through each option: automatic setup, manual setup, and extension-based control, plus common questions and troubleshooting. I’ll also include one table you can use as a quick reference and a short checklist-style list so you can set things up fast without overthinking it.
If you already have a proxy provider that gave you an IP address, a port, and maybe a username and password, you’re ready to go. If you don’t have a source yet, you can explore offers from platforms like https://proxys.io/en to get access to dedicated IPs, different locations, and rotation options.
How to Add a Proxy in Chrome on Windows (Manual Method)
On Windows, Chrome does not have a separate “use this proxy” toggle inside the browser itself. Instead, Chrome follows the Windows system proxy settings. So you configure it once at the system level and Chrome automatically starts using it.
Here is the full process on a modern Windows system:
- Open Chrome.
- Click the three dots (Customize and control Google Chrome) in the top-right corner.
- Go to “Settings.”
- Scroll down (or use the left sidebar) and open “System.”
- Click “Open your computer’s proxy settings.”
At this point Chrome will hand you off to Windows. You’ll see the Windows proxy configuration panel. Now it’s time to enter the proxy details you received from your provider.
There are two common ways to proceed:
Option A: Automatic configuration script (Setup script / PAC URL)
If your provider or company gave you an “Automatic proxy setup” script URL:
- Under “Automatic proxy setup,” turn on “Use setup script.”
- Paste the script address/URL you were given.
- Click “Save.”
This tells Windows (and therefore Chrome) to follow dynamic rules from that script. A PAC file can define logic such as “use this proxy for these domains, go direct for others.” It’s flexible and often used in corporate environments.
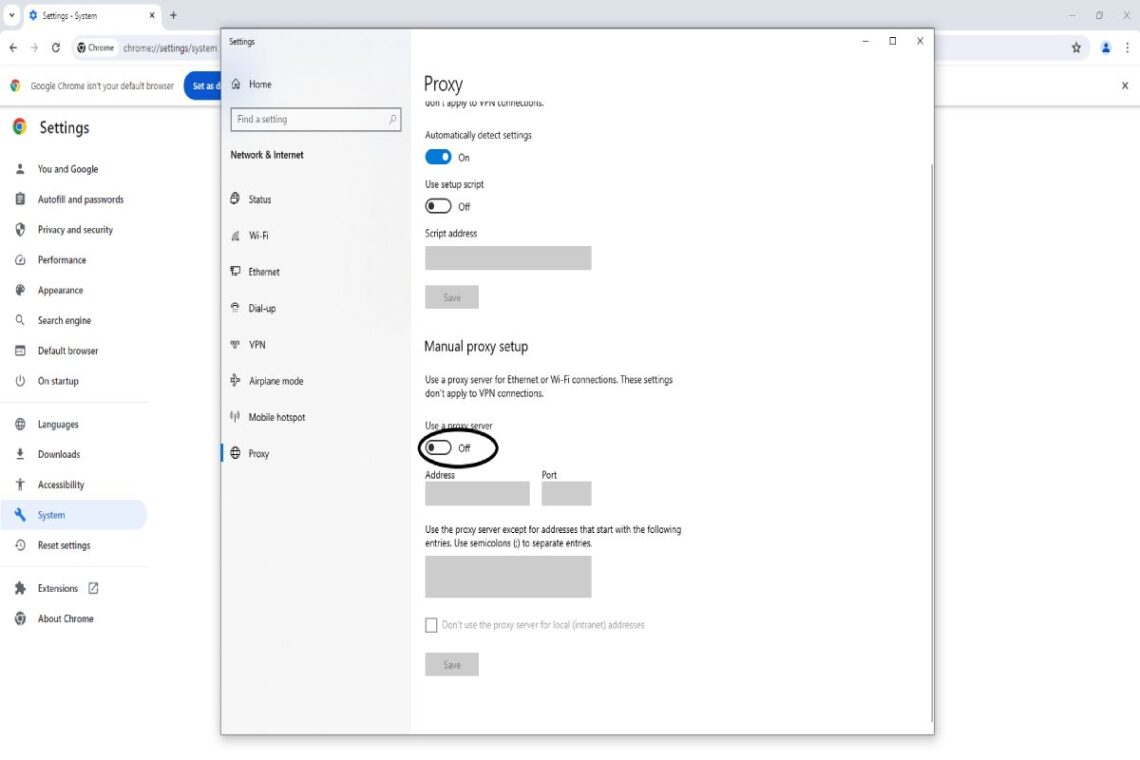
Option B: Manual proxy configuration (IP:Port)
If you were given a single IP and port, for example 123.45.67.89:8080:
- Under “Manual proxy setup,” turn on “Use a proxy server.”
- In the “Address” field, enter the proxy server’s IP address.
- In the “Port” field, enter the port number.
- If you see a box called “Don’t use the proxy server for local (intranet) addresses” or “Use proxy server except for…,” decide whether you want to bypass local network resources. Many workplaces keep internal tools off the proxy, so they’ll list internal domains there.
- Click “Save.”
From that moment, Chrome will send traffic through that proxy. If the proxy requires authentication, you may get a pop-up in Chrome asking for a username and password the first time you try to load a webpage. Enter the credentials from your provider and confirm.
A quick example
Let’s imagine you got these credentials from a data-center proxy provider:
- Address (IP): 198.51.100.24
- Port: 3128
- Username: client_2025
- Password: securepass
You would paste the IP into Address, 3128 into Port, save, then refresh Chrome. The first time you browse, Chrome will ask for client_2025 and securepass. After that, you’re set unless you clear auth or switch proxies.
One note: after you enable a system-wide proxy in Windows, all apps that respect system settings may also start using it, not just Chrome. If you only want the proxy in Chrome and not in other apps, jump ahead to the extension method later in this guide.
How to Add a Proxy in Chrome on macOS
On macOS, Chrome also uses the system network configuration. That means you’ll add your proxy details in Network Preferences, and Chrome will automatically follow them.
Here’s how to do it:
- Open Chrome.
- Click the three dots in the top-right corner.
- Open “Settings.”
- Scroll and select “System.”
- Click “Open your computer’s proxy settings.”
Now macOS System Settings (or System Preferences, depending on version) will open the Network panel for your active connection (for example, Wi-Fi).
Follow these steps:
- Choose your active network interface (Wi-Fi or Ethernet).
- Click “Details…” / “Advanced…” (the exact label depends on macOS version).
- Go to the “Proxies” tab.
Inside the Proxies tab, you’ll see multiple checkboxes such as “Web Proxy (HTTP),” “Secure Web Proxy (HTTPS),” “SOCKS Proxy,” and so on.
For a typical HTTP or HTTPS proxy:
- Tick “Web Proxy (HTTP)” and/or “Secure Web Proxy (HTTPS)” depending on what you were given.
- Enter the proxy server address (hostname or IP).
- Enter the port number.
- If authentication is required, check “Proxy server requires password,” then enter the username and password.
- Click “OK,” then “Apply.”
From this moment, Chrome will route traffic using that proxy. Just like on Windows, macOS applies this at the system level for that network interface. So any other browser or app using system proxy rules may also be affected.
If you need to stop using that proxy later, come back to the same Proxies tab and untick the boxes you enabled. Click “OK,” then “Apply,” and Chrome will immediately go back to direct connection.
Using a Chrome Proxy Extension (Per-Browser Control)
Sometimes you don’t want to touch system settings at all. Maybe you only want the proxy for marketing audits inside Chrome and you don’t want other apps on your laptop to use it. Or maybe you need to switch between several IP addresses all day and you’re tired of opening Windows or macOS settings every time. This is where a Chrome extension helps.
A Chrome proxy extension usually does two things:
- It lets you store one or more proxy profiles (IP, port, username, password).
- It lets you switch between them with one click, often from the Chrome toolbar.
The process is generally like this:
- Go to the Chrome Web Store.
- Search for a reputable “proxy manager” or “proxy switcher.”
- Add the extension to Chrome.
- Open the extension’s dashboard (usually via its icon in the top-right corner of Chrome).
- Create a new profile.
- Enter the proxy server address, port, and credentials from your provider.
- Save it.
- Activate that profile.
From then on, only Chrome traffic managed by that extension will be routed through that proxy profile. Other desktop applications will keep using your normal direct connection. This is convenient for SEO specialists, ad buyers, QA testers, and analysts who need to work across multiple regions or multiple projects without changing the whole system.
One important detail: some extensions will try to change Chrome’s internal proxy settings via the chrome.proxy API. That still technically sets a proxy for Chrome as an application, but it does not always affect other apps. So even though Chrome is “following the proxy,” the rest of your system is unchanged. This is often exactly what you want.
Fast checklist for the extension method
Here is a short, no-fluff checklist you can follow:
- Install a trusted Chrome proxy manager extension.
- Add a new proxy profile with IP, port, and (if needed) username/password.
- Turn that profile ON.
- Test by visiting an IP checker page to confirm Chrome shows the new IP.
- Turn the profile OFF when you’re done.
That’s it. No system changes. No reboot.
Common Settings Explained (Reference Table)
When you configure a proxy, you’ll see a few repeating terms. Use this table as a quick cheat sheet so you don’t guess wrong and lock yourself out of your own connection.
| Setting / Term | What It Means |
| Proxy IP / Address | The server address you’ve been given. Can look like a numeric IP (203.0.113.10) or a hostname. |
| Port | The door you connect through on that server. Common examples: 80, 3128, 8080, 1080, etc. |
| HTTP / HTTPS Proxy | Handles normal web traffic. Chrome can use this for most browsing tasks. |
| SOCKS Proxy | A more general tunnel method (SOCKS4 / SOCKS5). Some tools prefer this for certain workflows. |
| PAC / Setup Script / Auto URL | A configuration script that decides when to use the proxy, and for which domains. |
| Authentication / Credentials | Username and password required by the proxy provider to allow access. |
| Bypass List / Exceptions | Domains or addresses that should connect directly instead of going through the proxy. |
When you see a field called “Bypass proxy for” (Windows wording) or “Bypass proxy settings for these Hosts & Domains” (macOS wording), that’s where you list internal or trusted domains you do not want routed through the proxy. For example: localhost; 127.0.0.1; intranet.company.local. It’s optional, but many IT teams use it.
How to Test if Chrome Is Really Using the Proxy
After you add a proxy in Chrome (through Windows, macOS, or an extension), you should test it. Otherwise you’re just trusting that you clicked the right buttons. Testing is simple:
First, open Chrome and visit any “What’s my IP” checker site. Check the IP address it shows you. Then turn the proxy off and repeat the test. If the IP changes between “proxy ON” and “proxy OFF,” Chrome is definitely routing traffic through that proxy.
Second, try to load a few normal websites. If the proxy is misconfigured (wrong port, for example), pages may fail to load or load very slowly. If you get constant credential pop-ups, double-check the username and password from your provider. If your proxy plan has traffic limits, you might also see errors once you hit that limit.
Third, if your company uses a PAC script, confirm that internal tools still load the way they’re supposed to. A PAC script can treat internal and external traffic differently, so you want to be sure both still work.
If something breaks and you can’t browse at all, don’t panic. Go back to the proxy settings and simply turn everything off. On Windows, toggle “Use a proxy server” to Off. On macOS, untick the proxy checkboxes. Click Apply. Chrome will immediately go back to direct access.
Tips, Good Practice, and Mistakes to Avoid
It sounds dramatic, but misconfiguring a proxy can lock you out of the web until you undo the change – especially if you set it system-wide and you’re on a machine that depends on internet access for work. So here are a few practical tips that save headaches:
- Always save the original (no-proxy) state somewhere. Before you change anything, take a screenshot of your current proxy panel. That way if something goes wrong, you can restore it exactly.
- Don’t guess ports. If your provider told you “port 8000,” use 8000. If you type 80 because it “looks normal,” you might hit the wrong service or get no response at all.
- Watch for typos in IP addresses. One wrong digit and Chrome can’t connect anywhere. Slow connection can be normal if the proxy server is geographically far from you, but “nothing loads at all” usually means a typo or a blocked port.
- Respect authentication. If your proxy is protected by username/password, never share those credentials publicly. Treat them like you’d treat access to an analytics dashboard or ad account.
- Keep performance expectations realistic. Routing traffic through another server will usually add some latency. It’s like taking a slightly longer road to the same destination. That’s normal.
- Use separate browser profiles if needed. Chrome lets you create multiple browser profiles (for example “Work Research,” “Personal,” etc.). You can dedicate one profile to run through a proxy extension and keep another profile clean.
Below is a short list you can treat as a daily routine when working with multiple proxies or multiple regions:
- Check which profile is active in Chrome.
- Confirm which proxy (if any) is currently ON.
- Verify IP before doing sensitive or region-specific tasks.
- Turn the proxy OFF when you’re done to avoid confusion later.
- Document which IP/port pair belongs to which task or client.
This sounds small, but it protects you from sending the wrong report to the wrong client because you forgot you were still using a test IP.
Final Thoughts on Adding a Proxy in Chrome
Setting up a proxy in Google Chrome is not hard once you understand one key rule: Chrome mostly follows your operating system. On Windows, you open Chrome settings, jump into “Open your computer’s proxy settings,” and then choose either automatic script or manual server. On macOS, you do the same, then pick the correct boxes in the Proxies tab of your network settings. And if you want even more control – for example, you need different IPs for different tasks, or you don’t want to affect the whole computer – you can manage everything with a Chrome proxy extension instead of changing system settings.
The goal here is not complexity. The goal is control. With the right setup, you decide exactly how Chrome connects, which server it talks through, and when. That level of control is valuable for marketing teams, QA testers, researchers, and anyone who needs predictable traffic routing. Just make sure you get clean, reliable proxy access from a trusted service, record the credentials safely, and test the connection before doing anything important.
Once you’ve done the process once or twice – add IP, add port, save, authenticate, verify IP – it becomes routine. You’ll be able to switch between default browsing and routed browsing the same way you switch between browser tabs.